| Content: | ||||||||||||||||||||||||||||||||||||||||||||||||||||||||||||||||||||||||||||||||||||||||||||||||||||||||||||||||||||||||||||||||||||||
| STANDARDS: ASTM D 333, D 1210, D 1316; ISO 1524; FTMS 141a
Fineness of Grind Gages also called grind gages and Hegman gages. Many types of solid materials must be ground or milled into finer particles for dispersion in appropriate liquid vehicles. The physical properties of the resulting dispersions, often called “grinds”, depend not only on the actual size of the individual particles, but also on the degree to which they are dispersed.
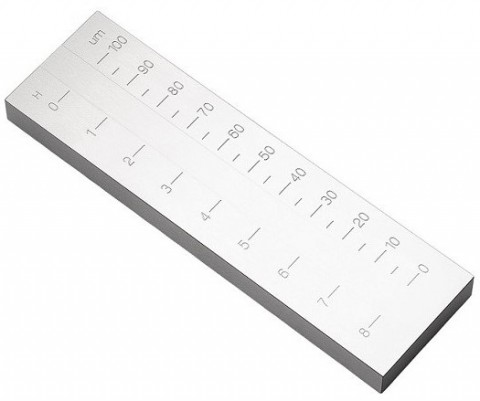
The Fineness of Grind Gage is used to indicate the fineness of grind or the presence of coarse particles or agglomerates in a dispersion. It does not determine particle size or particle size distribution. Grind gages are used in controlling the production, storage and application of dispersion products produced by milling in the paint, plastic pigment, printing ink, paper, ceramic, pharmaceutical, food and many other industries. The Fineness of Grind Gage is a flat steel block in the surface of which are two flat-bottomed grooves varying uniformly in depth from a maximum at one end of the block to zero near the other end. Groove depth is graduated on the block according to one or more scales used for measuring particle size. Most gages will have one scale marked in either mils or microns. 1 mil = 25.4 microns 1 mil = 0.001 inch 1 micron, µm – 0.001 mm
The Hegman scale ranges from 0 to 8 with numbers increasing as the particle size decreases. 0 Hegman = 4 mil/100 micron particle size 4 Hegman = 2 mil/50 micron particle size 8 Hegman = 0 mil/0 micron particle size We offer a wide variety of grind gages varying in scales, number of grooves, length and width of grooves and size of the block. Comes in a reusable box to prevent damage. Procedure Place a slight excess of sample in the deep end of the groove and, with the straight-edge scraper provided, draw the sample toward the shallow end of the groove. Ratings are in terms of the point on the scale where the oversize particles, or furrows made by them, first appear in substantial concentration.
Care of Grind Gages Clean the gage after each use. Use a solvent and a soft cloth. Keep the gage covered or encased at all times when not in use. Protect gages that lie idle for extended periods of time from rust with an oil coating or oil soaked wrap.
Technical Data
Comes Complete with: Grind Block Scraper Application Manual Reusable Storage Case |
||||||||||||||||||||||||||||||||||||||||||||||||||||||||||||||||||||||||||||||||||||||||||||||||||||||||||||||||||||||||||||||||||||||


